Unleash the Power of GPT-4 API & Google Sheets: A Step-by-Step Guide to Integration
Introduction to Gpt-4 and Google Sheets
GPT-4
GPT-4 stands for Generative Pre-trained Transformer 4. It’s an artificial intelligence system that can create human-like text. It is a large multimodal model that accepts image and text inputs, emitting text outputs. It is less capable than humans in many real-world scenarios but exhibits human-level performance on various professional and academic benchmarks. Thanks to its broader general knowledge and problem-solving abilities, it can solve complex problems more accurately. It is more creative and collaborative than ever before. It can generate, edit, and iterate with users on creative and technical writing tasks, such as composing songs, writing screenplays, or learning a user’s preferences and style to generate personalized content.
Google sheets
Google Sheets is a cloud-based spreadsheet application that allows users to create and manipulate spreadsheets online. It is part of the Google Workspace suite of applications and can be accessed from any device with an internet connection. Google Sheets offers many features, including collaboration tools, formulas and functions, and charts and graphs.
Integrating GPT-4 with Google Sheets can be useful in a number of ways
Data analysis and visualization: By integrating GPT-4 with Google Sheets, you can perform natural language processing (NLP) on data in your spreadsheets to gain insights and identify patterns that may not be immediately apparent from the data itself. You can also use GPT-4 to generate summaries or reports based on the data.
Customer service: You can use GPT-4 to build a chatbot or virtual assistant that can interact with customers through Google Sheets. For example, you can create a chatbot that answers common customer questions, retrieves data from your spreadsheet, or even helps customers complete forms or applications.
Language translation: If you work with international teams or clients, you can use GPT-4 to translate text in your Google Sheets file into different languages. This can be particularly useful if you need to analyze data or collaborate with people who speak different languages.
Content creation: You can use GPT-4 to generate content for your Google Sheets file, such as product descriptions, marketing copy, or social media posts. This can save you time and effort in creating content from scratch.
Overall, integrating GPT-4 with Google Sheets can help you automate tasks, gain insights from data, and improve communication and collaboration with others.
Creating an application where we generate product descriptions for a given set of product details
To start integrating GPT with Google Sheets, you'll first need to create an OpenAI key. Check this video to learn about how ot create an OpenAI key
Open a new Google Sheet and name two columns Product Details and Product Description.
Next, go to the Extensions menu in Google Sheets and select Apps Script. This will open the Google Apps Script editor.
To ensure the security of your API key, it's recommended that you go to your project settings and add the key to a script file. This way, the key will be stored securely, and others will not be able to see it.
Connecting Gpt-4 API using apps script.
function gpt_4 (prompt,key) {
const messages = [
      {role: "system", content: "Given a set of details of product you should generate small description"},
      {role: "user", content: "Hey can you help me generate short excellent description for my products?"},
      {role: "assistant", content: "Please provide the details of your product."},
      {role: "user", content: prompt}
      ];
  const url = "https://api.openai.com/v1/chat/completions";
  const payload = {
    model: "gpt-4",
    messages: messages,
    temperature: 0.5,
    max_tokens: 200,
  };
  const options = {
    contentType: "application/json",
    headers: { Authorization: "Bearer " + key },
    payload: JSON.stringify(payload),
  };
  const results = JSON.parse(UrlFetchApp.fetch(url, options).getContentText());
  var x =  results.choices[0].message.content.trim();
  Logger.log(x);
  return x;
}
The above function gpt_4 takes two parameters, prompt and key. The prompt parameter is a string that contains the details of the product for which a description is to be generated, and the key parameter is an API key that is used to authenticate requests to the Gpt-4 API.
const messages = [
      {role: "system", content: "Given a set of details of product you should generate small description"},
      {role: "user", content: "Hey can you help me generate short excellent description for my products?"},
      {role: "assistant", content: "Please provide the details of your product."},
      {role: "user", content: prompt}
      ];
This block of code defines an array called messages that contains a sequence of messages that will be used as input to the GPT-3.5 model. The messages array includes a system message, a user message, an assistant message, and the prompt parameter provided as input by the user. These messages serve as a context for the model to generate a relevant description to the input.
const url = "https://api.openai.com/v1/chat/completions";
  const payload = {
    model: "gpt-4",
    messages: messages,
    temperature: 0.5,
    max_tokens: 100,
  };
This code block sets up the API request to the OpenAI GPT-4 model. The url variable contains the API endpoint for the chat completions API. The payload object contains the data that will be sent to the API, including the model name ("gpt-4"), the messages array defined earlier, the temperature value (0.5), and the maximum number of tokens (100) that the model is allowed to generate.
const options = {
    contentType: "application/json",
    headers: { Authorization: "Bearer " + key },
    payload: JSON.stringify(payload),
  };
This code sets up the request options, including the content type (JSON), the API authorization key (passed as a parameter to the function), and the payload data (serialized as a JSON string).
const results = JSON.parse(UrlFetchApp.fetch(url, options).getContentText());
  var x =  results.choices[0].message.content.trim();
  Logger.log(x);
  return x;
This block of code sends the API request to the OpenAI model using the UrlFetchApp.fetch() method, which returns the API response as a JSON string. The response is parsed into a JavaScript object using the "JSON.parse" method, and the generated text is extracted from the response using dot notation. Finally, the generated text is trimmed and returned as the function's output.
function run(){
  var sheet = SpreadsheetApp.getActiveSpreadsheet().getActiveSheet();
  var activeCell = sheet.getActiveCell();
  var value = activeCell.getValue();
  var col = activeCell.getColumn();
  var row = activeCell.getRow();
  if(col!=1 || value==null || row==1)return;
  var properties = PropertiesService.getScriptProperties();
  var apiKey = properties.getProperty('openai');
  var response = gpt_4(value,apiKey);
  Logger.log(response);
  sheet.getRange(row,col+1).setValue(responce);
}
First, we retrieve the active sheet from the current spreadsheet by Using the SpreadsheetApp.getActiveSpreadsheet().getActiveSheet(). Then we retrieve the active cell that triggered the event using getActiveCell(). We then retrieve the row num, col num, and the value using getRow(), getColumn(), and getValue(). We ensure that the data is from column 1 and starts from the 2nd row as the 1st row contains column names. The value is not equal to null. We have stored our API key in script properties. PropertiesService.getScriptProperties() function returns a Properties object that can be used to store and retrieve key-value pairs in the script properties. properties.getProperty('openai') retrieves the value of the key 'openai' from the script properties. Then we fetch data from the openai using the gpt_4 function and store the result in google Sheets using getRange(row, col) for retrieving the cell where we store our data in sheets and setValue(response) sets the value in the cell.
function formatting(){
  let sheet = SpreadsheetApp.getActiveSpreadsheet();
  let headers = sheet.getRange('A1:B1');
  let table = sheet.getDataRange();
  headers.setFontWeight('bold');
  headers.setFontColor('white');
  headers.setBackground('#52489C');
  table.setFontFamily('Roboto');
 table.setBorder(true,true,true,true,false,true,'#52489C',SpreadsheetApp.BorderStyle.SOLID);
}
The function formatting () formats the active spreadsheet by applying certain formatting rules to the sheet. Specifically, we set the font weight, font color, and background color of the header row (cells A1 and B1) and set the font family and border style for the entire data range. The border style is set to solid with a thickness of 1 pixel and a color of '#52489C'. This function is used to quickly format a new or existing spreadsheet to have a professional and consistent appearance.
Final Code
function gpt_4 (prompt,key) {
const messages = [
      {role: "system", content: "Given a set of details of product you should generate small description"},
      {role: "user", content: "Hey can you help me generate short excellent description for my products?"},
      {role: "assistant", content: "Please provide the details of your product."},
      {role: "user", content: prompt}
      ];
  const url = "https://api.openai.com/v1/chat/completions";
  const payload = {
    model: "gpt-3.5-turbo",
    messages: messages,
    temperature: 0.5,
    max_tokens: 200,
  };
  const options = {
    contentType: "application/json",
    headers: { Authorization: "Bearer " + key },
    payload: JSON.stringify(payload),
  };
  const results = JSON.parse(UrlFetchApp.fetch(url, options).getContentText());
  var x =  results.choices[0].message.content.trim();
  Logger.log(x);
  return x;
}

function run(){
  var sheet = SpreadsheetApp.getActiveSpreadsheet().getActiveSheet();
  var activeCell = sheet.getActiveCell();
  var sheet = SpreadsheetApp.getActiveSheet();
  var value = activeCell.getValue();
  var col = activeCell.getColumn();
  var row = activeCell.getRow();
  if(col!=1 || value==null || row==1)return;
  var properties = PropertiesService.getScriptProperties();
  var apiKey = properties.getProperty('openai');
  Logger.log(apiKey)
  var responce = gpt_4(value);
  Logger.log(responce);
  sheet.getRange(row,col+1).setValue(responce);
}
function formating(){
  let sheet = SpreadsheetApp.getActiveSpreadsheet();
  let headers = sheet.getRange('A1:B1');
  let table = sheet.getDataRange();
  headers.setFontWeight('bold');
  headers.setFontColor('white');
  headers.setBackground('#52489C');
  table.setFontFamily('Roboto');
  table.setBorder(true,true,true,true,false,true,'#52489C',SpreadsheetApp.BorderStyle.SOLID);
}
Copy this code and paste it into the editor and set up the triggers as mentioned Below.
Triggers
In order to automate the google sheets you need to set up triggers. In Google Sheets, a trigger is an event that initiates a script function to run automatically. Triggers can be set up to run a script at a specific time or when a certain action occurs, such as when a user edits a cell, opens a document, or submits a form. There are two types of triggers in Google Sheets:
Time-driven triggers: These triggers run a script function at a specific time or interval, such as every hour or at a specific time of day.
Event-driven triggers: These triggers run a script function in response to a specific event, such as when a user edits a cell or opens a document.
We will be using Event-driven triggers. In Event-driven there are Installable triggers and simple triggers. We will be using Installable Triggers as they can run scripts with more advanced functionality, such as accessing external APIs or sending emails. Installable triggers need to be set up manually in the Google Sheets script editor, and they require authorization from the user.
There are four types of installable triggers in Google Sheets:
On edit: This trigger fires when a user edits a cell or range of cells in a sheet.
On change: This trigger fires when a user modifies the contents or formatting of a cell or range of cells, or when a sheet or its contents are changed in some other way (e.g., through an external API).
On form submit: This trigger fires when a user submits a response to a form that is linked to the sheet.
On Open: This Trigger fires automatically when a user opens a spreadsheet.
Setting up Triggers
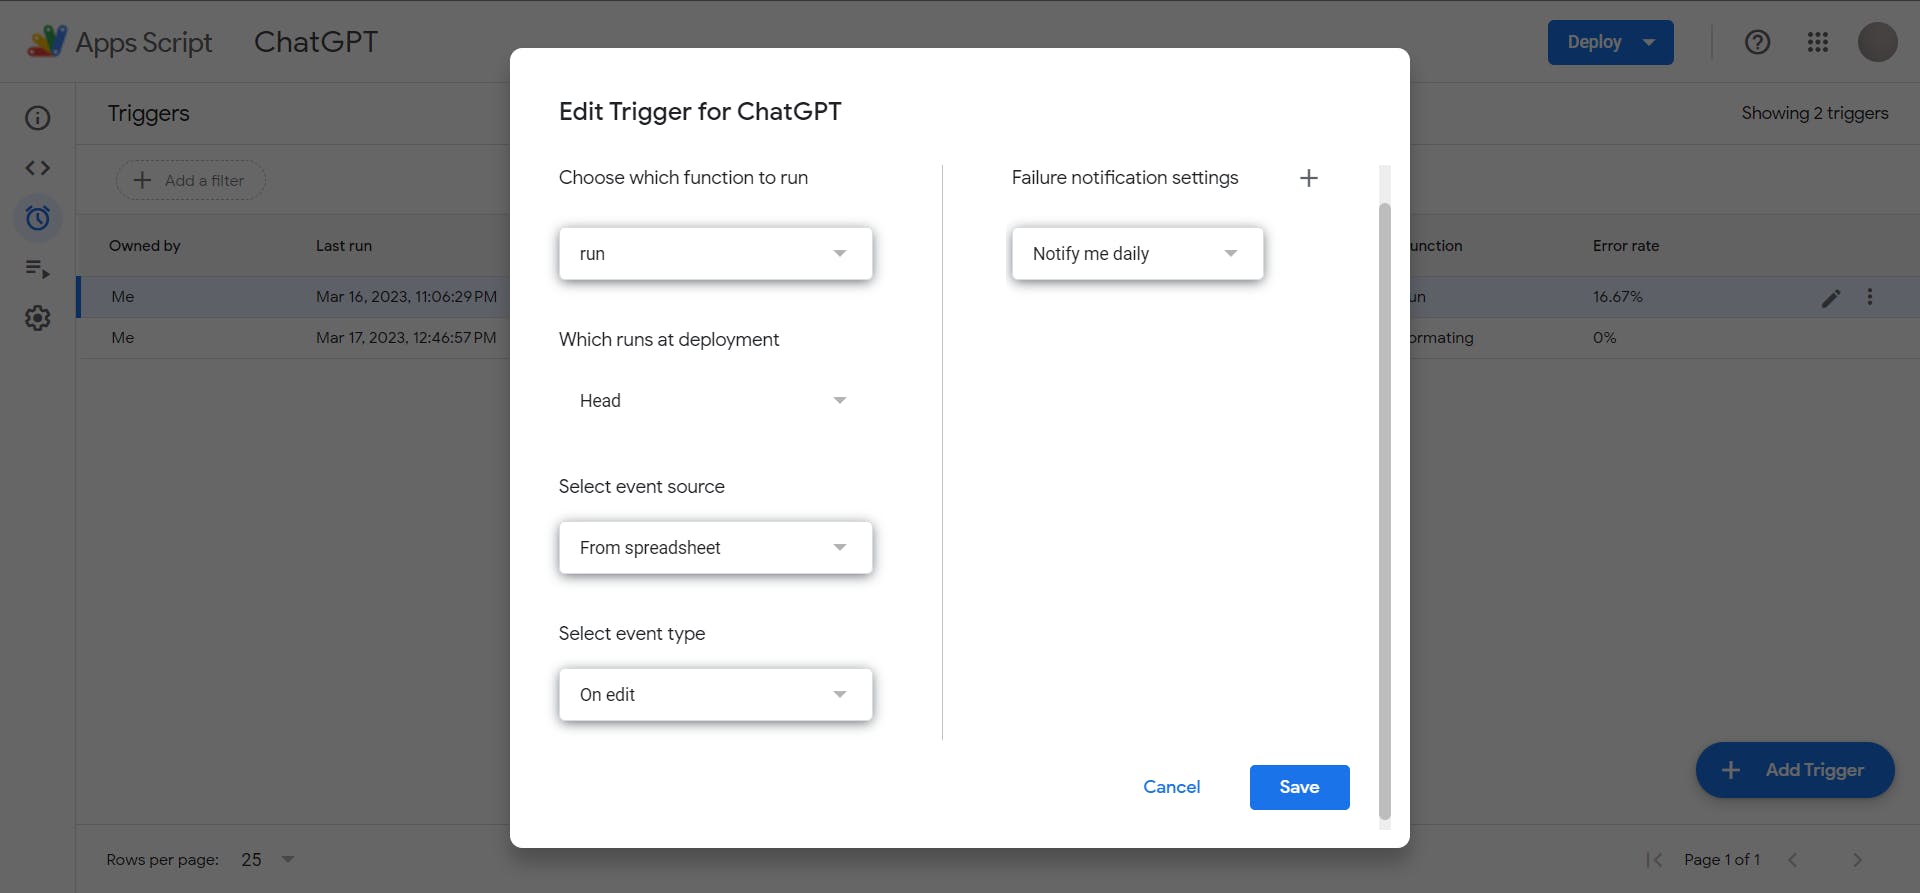
On Edit Trigger: In Google Sheets, the OnEdit trigger allows you to automate certain actions whenever a user edits a cell in the spreadsheet. To set up a OnEdit trigger, you need to go to the Triggers menu in the script editor and select Add Trigger. Then, choose On edit as the event type and specify the function to be executed when the trigger fires. In this case, the run() function takes the data from the edited cell and inserts its response into the sheet.

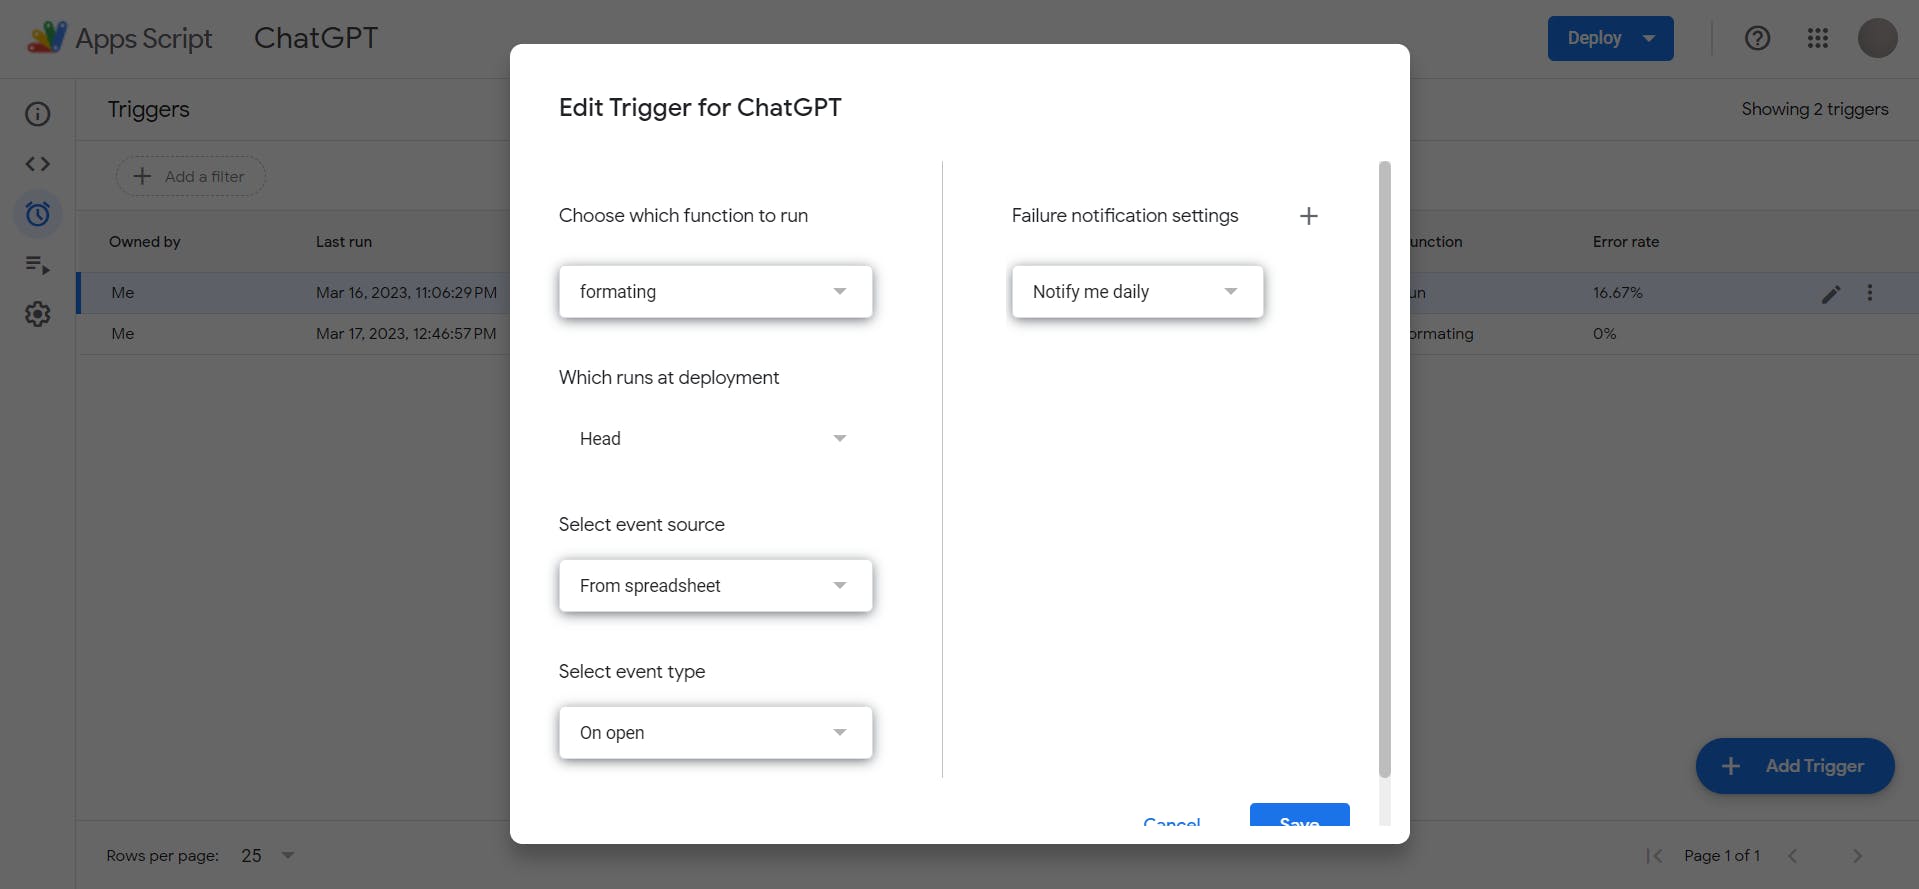
On Open Trigger: The OnOpen trigger in Google Sheets allows you to automate certain actions whenever a user opens the spreadsheet. For example, you might want to format the sheet in a particular way or display a custom sidebar or dialog box with instructions. To set up an OnOpen trigger, go to the Triggers menu in the script editor and select Add Trigger. Then, choose On open as the event type and specify the function to be executed when the trigger fires. In this case, the formatting() function is used to set a new professional appearance for the sheet whenever it is opened.

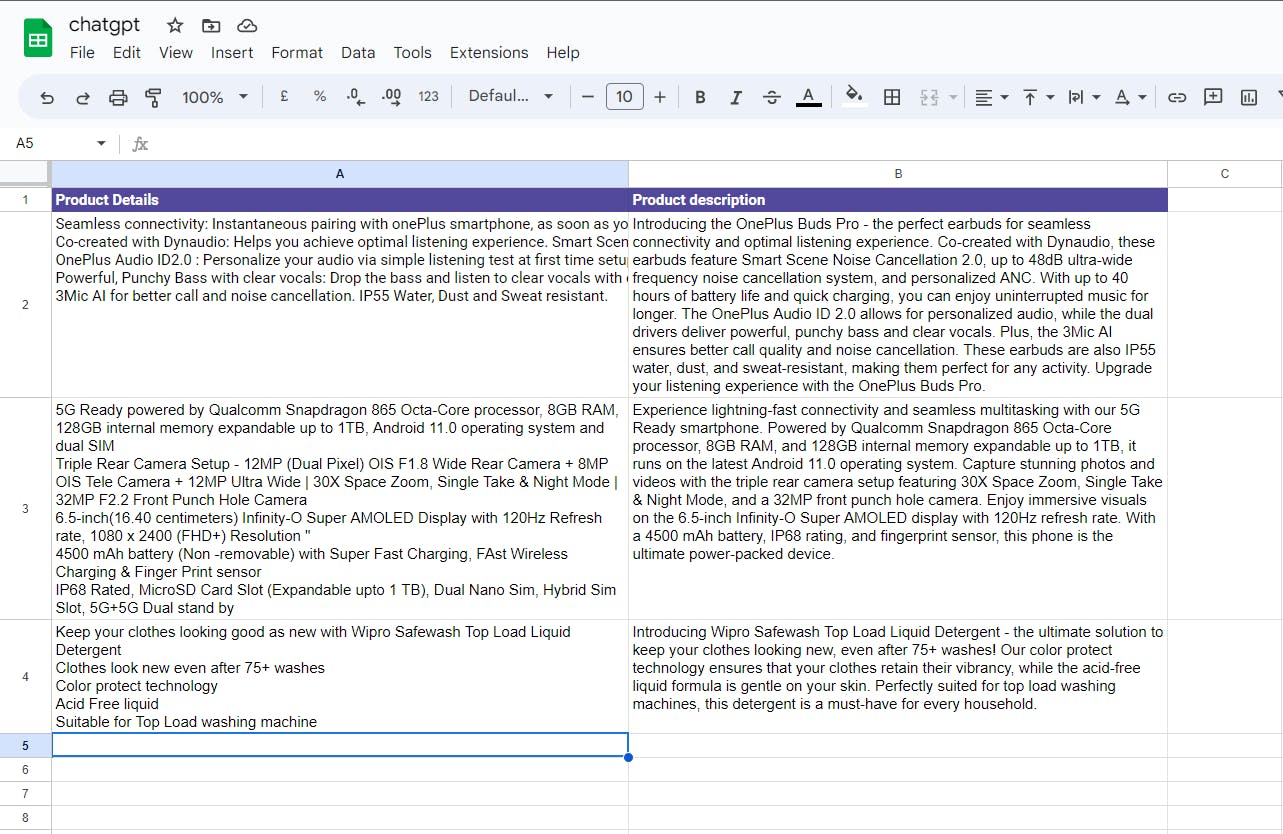
Sample Google Spreadsheet

Executions
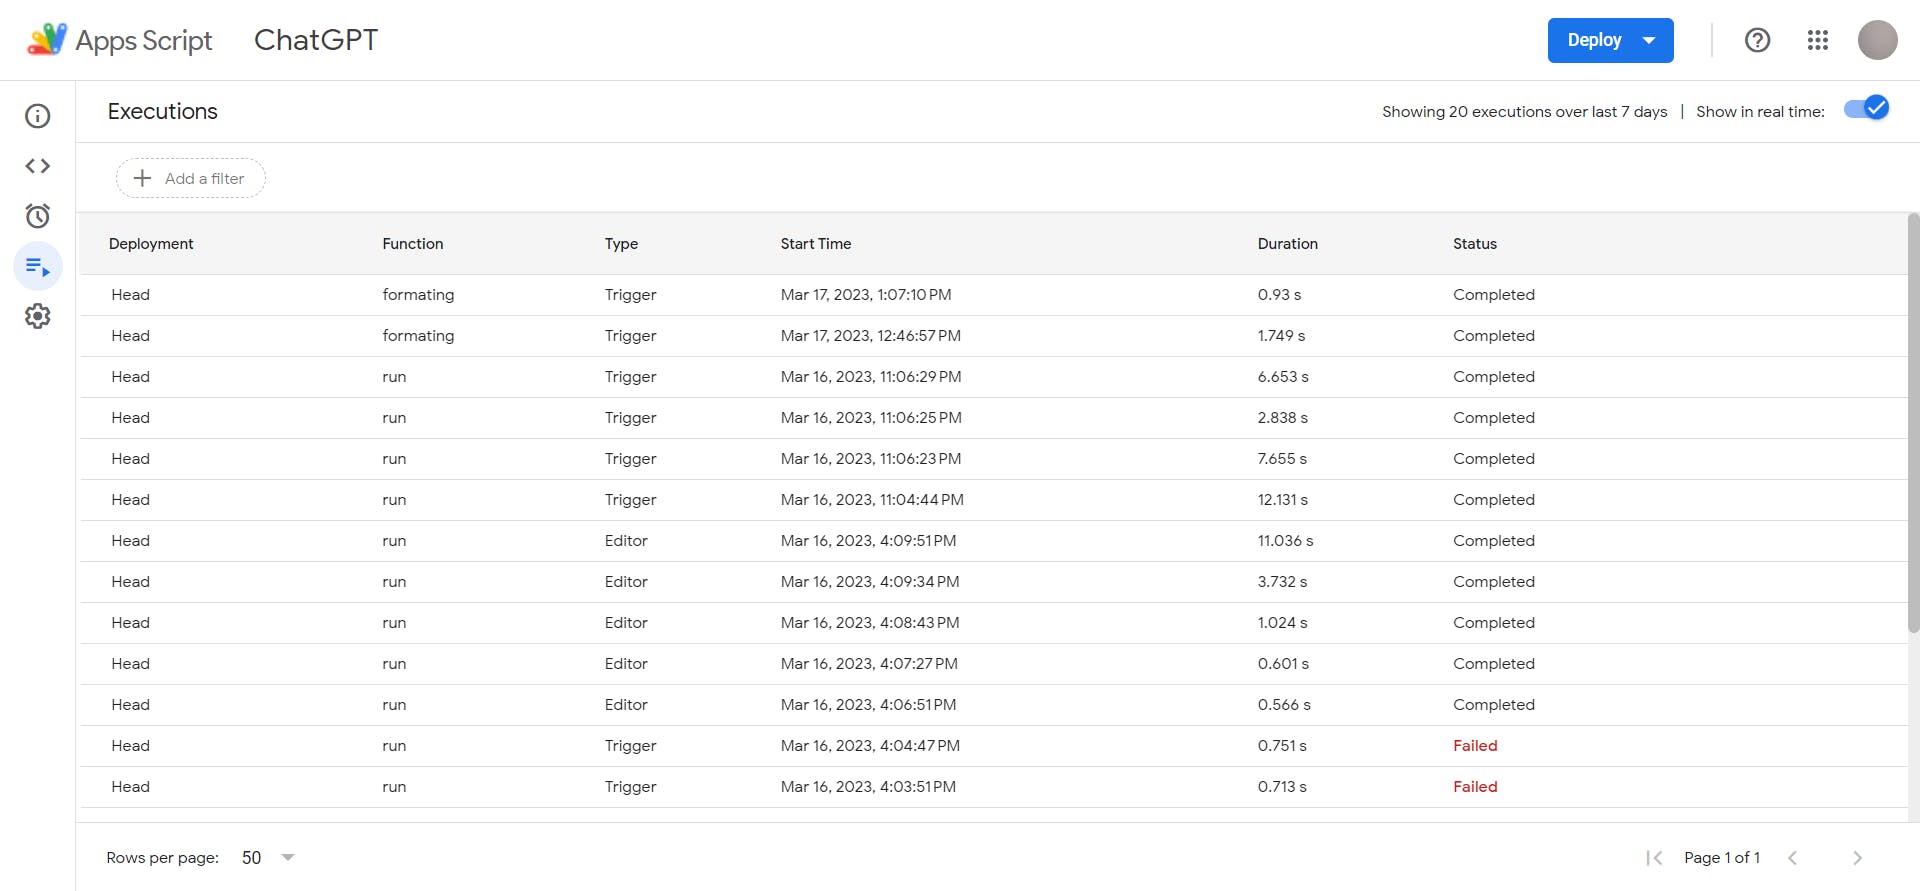
You can view your script's executions in the Executions tab of the script editor. This tab displays a list of all executions of the script, including the start and end times, the function that was called, and any error messages that occurred during the execution. You can also view the execution logs, which provide more detailed information about the script's execution, such as the values of variables and the execution stack.
By monitoring the executions of your script, you can identify any issues or errors that occur and take steps to fix them. You can also use the information from the execution logs to optimize your script's performance and make it run more efficiently.

If you Want to know more about Apps Script, Go through these docs.
Want to learn more about GPT-4 Use cases?
👇 Check this video
Looking to stay up to date on the latest AI tools and applications? Look no further than AI Demos. This directory features a wide range of video demonstrations showcasing the latest and most innovative AI technologies. Whether you're an AI enthusiast, researcher, or simply curious about the possibilities of this exciting field, AI Demos is your go-to resource for education and inspiration. Explore the future of AI today with aidemos.com
Follow Futuresmartai to stay up-to-date with the latest and most fascinating AI-related blogs - FutureSmart AI
