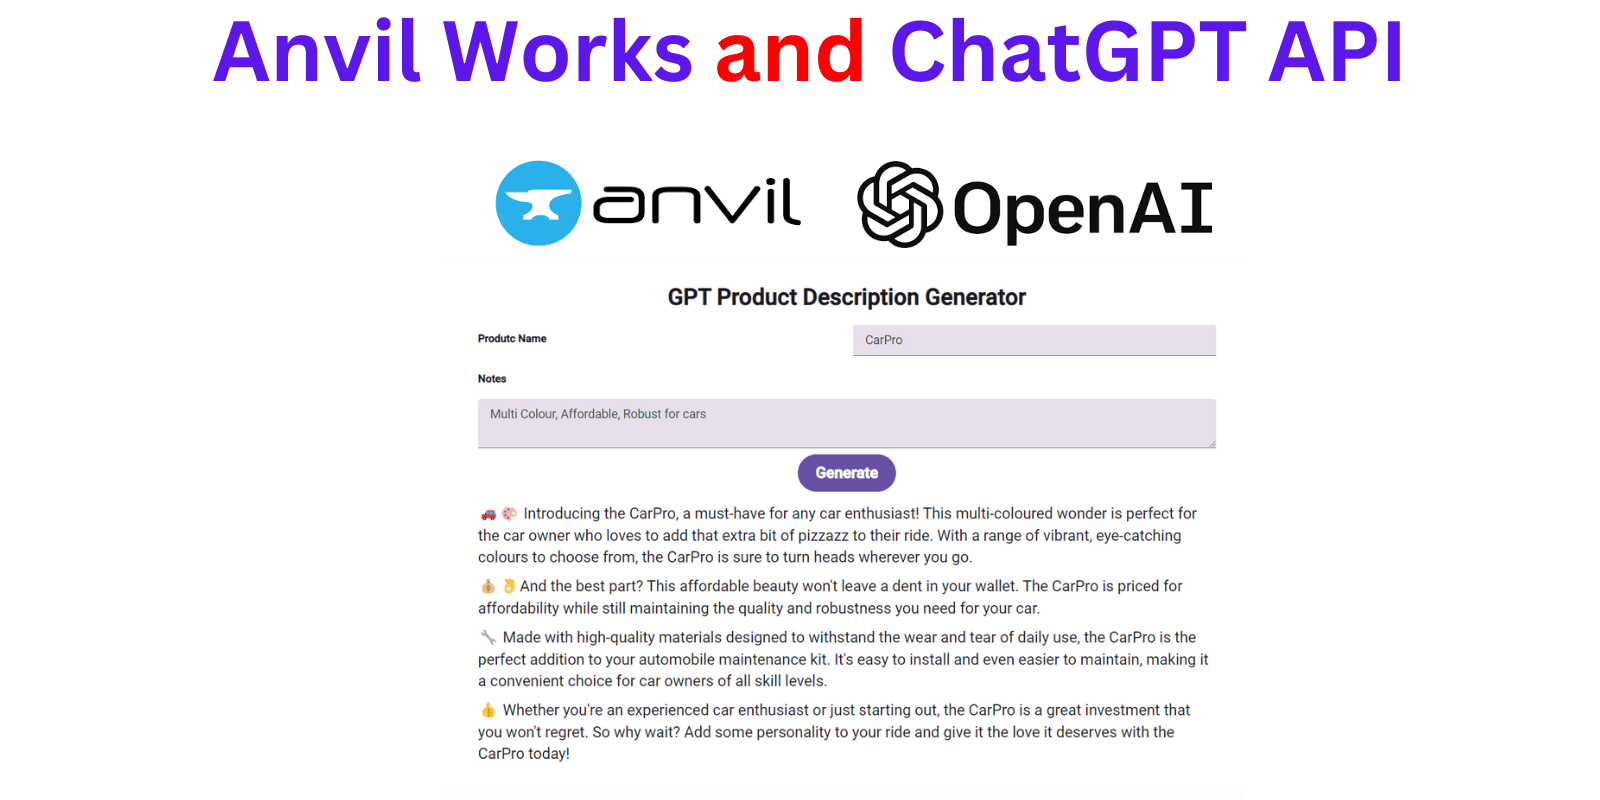
In the world of web app development, Anvil Works and OpenAI's ChatGPT API stand out as powerful tools that developers can leverage to simplify their work process and deliver remarkable results. In this tutorial, we'll illustrate how these tools can be used in conjunction to develop an AI-powered product description generator.
Our main focus won't be on the product description generator per se, but on the integration and use of Anvil's intuitive web app builder and OpenAI's advanced language model, ChatGPT.
Anvil: A Paradigm Shift in Web App Development
Anvil is a free Python-based platform that allows you to build fully-featured web applications quickly and effortlessly. It has a drag-and-drop interface for designing the user interface and uses Python for both frontend and backend code.
So, why would you prefer Anvil over other popular frameworks like Streamlit? Here's why:
UI Design: Anvil provides a drag-and-drop designer, giving you total control over your app's look and feel.
Deployment: With just two clicks, your app is deployed to the cloud. You can even add your custom domain.
Authentication: Anvil comes with a built-in user authentication feature.
API Integration: Connecting to external APIs is straightforward with Anvil.
OpenAI's ChatGPT API: Powering Conversational AI
ChatGPT API by OpenAI is a state-of-the-art language model that is capable of generating human-like text. It can carry on a conversation, write essays, answer questions, and even perform certain tasks. In this tutorial, we'll be using this API in our Anvil server module to bring AI-powered capabilities to our web application.
Building the User Interface with Anvil
The user interface is a crucial part of any application. With Anvil, we use its drag-and-drop designer to create an intuitive interface for our application. Here is the UI code for our application:
from ._anvil_designer import Form1Template
from anvil import *
import anvil.server
class Form1(Form1Template):
def __init__(self, **properties):
self.init_components(**properties)
def button_1_click(self, **event_args):
product_name = self.text_box_1.text
notes = self.text_area_1.text
input = f'The product name is {product_name} and the product notes are {notes}.'
description = anvil.server.call('generate_description', input)
self.rich_text_2.content = description
def text_box_1_pressed_enter(self, **event_args):
pass
In this code:
We create a Form class Form1 that inherits from Form1Template (auto-generated by Anvil). This class represents our form (or page) in the application.
The __init__ method initializes our form, setting up properties and data bindings.
The button_1_click method is triggered when a button is clicked. It retrieves the text from two input fields (text_box_1 and text_area_1), formats it into a string, and sends it to our server function 'generate_description'. The generated description is then displayed in our rich text box (rich_text_2).
The text_box_1_pressed_enter method is activated when the user presses Enter in the first text box. Although it doesn't perform any action in our current setup, it can be customized for various functionalities.
Implementing Server-side Operations with Anvil Server Module
Anvil's Server Modules provide a full server-side Python environment, letting you import any packages you need. We'll be using it to call OpenAI's ChatGPT API. Here is our server module code:
import anvil.server
import openai
openai.api_key = ""

@anvil.server.callable
def generate_description(input):
    messages = [
        {"role": "system",
         "content": """As a Product Description Generator, Generate multi paragraph rich text product description with emojis from the information provided to you' \n"""},
    ]

    messages.append({"role": "user", "content": f"{input}"})
    completion = openai.ChatCompletion.create(
        model="gpt-3.5-turbo",
        messages=messages
    )
    reply = completion.choices[0].message.content
    return reply
In this code:
We import the required modules and set up the OpenAI API key.
We define a server-side function generate_description that is callable from the client-side.
The generate_description function crafts a conversation with the OpenAI API. It first creates a 'system' message that provides instruction for the GPT-3 model. The 'user' message, containing the product name and notes input by the user, is then appended to the messages list.
The function sends this conversation to the OpenAI API, fetches the response, and returns it to the client-side code.
Wrapping Up
Anvil and ChatGPT can be your go-to tools for developing powerful AI-powered web applications. With Anvil's easy-to-use web app builder and OpenAI's advanced language model, you can build sophisticated applications that solve real-world problems.
For a more interactive experience and a step-by-step guide on building this app, check out the video tutorial on YouTube. The tutorial also covers deploying your web application with a custom URL using Anvil.
In conclusion, Anvil and ChatGPT are game-changers in web app development. Harnessing their combined power can open up new possibilities and help you create impressive applications with relative ease. Happy coding!
Jupyter Notebook: https://github.com/PradipNichite/Youtube-Tutorials/blob/main/Anvil%20Work%20and%20ChatGPT%20API.ipynb
Also, want to learn about the state-of-the-art stuff in AI? Don't forget to subscribe to AI Demos. A place to learn about the latest and cutting-edge tools in AI!