Interacting with Videos via VideoDB and OpenAI

I am Data Science Intern at FutureSmart AI where I am working on projects related to Langchain, Llamaindex, OpenAI, etc. I am Machine Learning Enthusiast and have passion for Data. Currently I am in my pre-final year pursuing my Bachelor's in Computer Science from IIIT Vadodara ICD .
Introduction
Welcome to the tutorial where we use the latest "Videodb" tool to chat with youtube videos. Previously we have explored tutorials featuring ChromaDB, Pinecone which were vector store databases used for texts. VideoDB provides a User Interface to store videos just as we do with texts. A video database is a database system optimized for storing, cataloging, and retrieving digital video content. Like traditional databases, video databases rely on metadata and indexes to organize the content and enable search and retrieval.
In this blog, we will walk through the entire process of setting up the development environment, incorporating OpenAI services into our application, and crafting a chatbot that can seamlessly converse the videos.
To explore more about ChatGPT API to build conversational chatbot, you can watch our video Using OpenAI's ChatGPT API to Build a Conversational AI Chatbot
Setting Up the Environment
To begin building our voice-responsive OpenAI chatbot, it's essential to set up the right development environment. This involves installing necessary libraries and configuring API access. Here's how you can get started:
Install Required Libraries
The chatbot relies on several Python libraries, as listed in the requirements.txt file. These libraries include Streamlit for chat interface, Videodb for accessing Video database and OpenAI for accessing GPT Model. Install them by running the following command in your project directory:
pip install -r requirements.txt
Here's a complete breakdown of all the libraries:
streamlit: For building and running the web app.openai: To access OpenAI's API for GPT Model.videodb: To access Video Database.
Creating account on VideoDB
To use Videodb, you need to create account on videodb.io. After creating account, generate a new API key for our application and copy it to clipboard.
Set Up the.env File
Sensitive information such as your OpenAI API key and VideoDB API key should be stored in a .env file. This approach keeps your credentials secure. Create a .env file in the root of your project and include your OpenAI API key and VideoDB API key like this:
videodb_api_key="your_videodb_api_key_here"
openai_api_key = "your_openai_api_key_here"
Ensure that this file is not shared publicly, especially if you are pushing your code to a public repository.
Understanding Project's structure
Our project primarily consists of two Python files:
streamlit.py: This file contains the Streamlit web application logic. It's where you define the user interface and manage the flow of input/output for the chatbot.db_utils.py: This file includes functions for connecting to Video Database, processing videos, querying videos as well as generating chatbot responses.
With our environment set up and a basic understanding of our project's structure, we are now ready to start building the chatbot's functionalities.
Building the Chatbot: Streamlit Interface(streamlit.py)
In this section, we dive into the construction of our chatbot, focusing on how the Streamlit interface is set up and how processing is done to store Videos in streamlit.py.
Streamlit Interface Setup
Streamlit is a powerful tool that allows us to quickly build interactive web applications for our chatbot. In streamlit.py, the Streamlit application is initialized and configured to handle user interactions:
import streamlit as st
from db_utils import upload_videos_to_database, getanswer

st.set_page_config(
    page_title="Youtube Video Query Bot🤖", layout="centered", initial_sidebar_state="auto"
)
#Initialising session states to store values
def initialize_session_state():
    if "messages" not in st.session_state.keys():
        st.session_state.messages = [
            {"role": "assistant", "content": "Hi! How may I assist you today?"}
        ]

    if "youtube_links" not in st.session_state.keys():
        st.session_state.youtube_links = []

    if "links_submitted" not in st.session_state.keys():
        st.session_state.links_submitted = False

initialize_session_state()
In this setup, we initialize the Streamlit app, import necessary functions from db_utils.py, and set up the session state to track and manage chat messages.
Additional Resource: A Video Tutorial for Streamlit chatbot is embedded here for better understanding:
Handling Youtube video links input
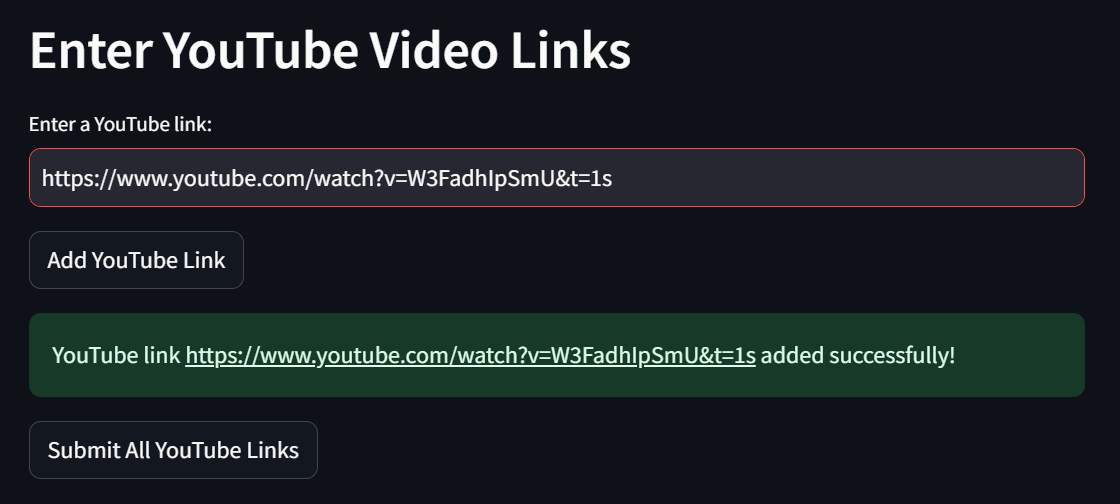
We take single or multiple video links input from user and store them in session state. User can enter one link at time and click Add Youtube link button which will add the video link to session state. Next user can enter new link again in the input box or continue with single video. Once all the video links have been entered, user can submit all the videos and lock the input box by clicking Submit All Youtube Links button.
st.header("Enter YouTube Video Links")
if not st.session_state.links_submitted:
youtube_link = st.text_input("Enter a YouTube link:")
if st.button("Add YouTube Link"):
st.session_state.youtube_links.append(youtube_link)
st.success(f"YouTube link {youtube_link} added successfully!")
youtube_link = ""
if st.button("Submit All YouTube Links"):
st.session_state.links_submitted = True
with st.spinner("Uploading and Indexing Video"):
upload_videos_to_database() #Uploading and processing the videos to Videodb
st.success("All YouTube links uploaded and indexed successfully!")
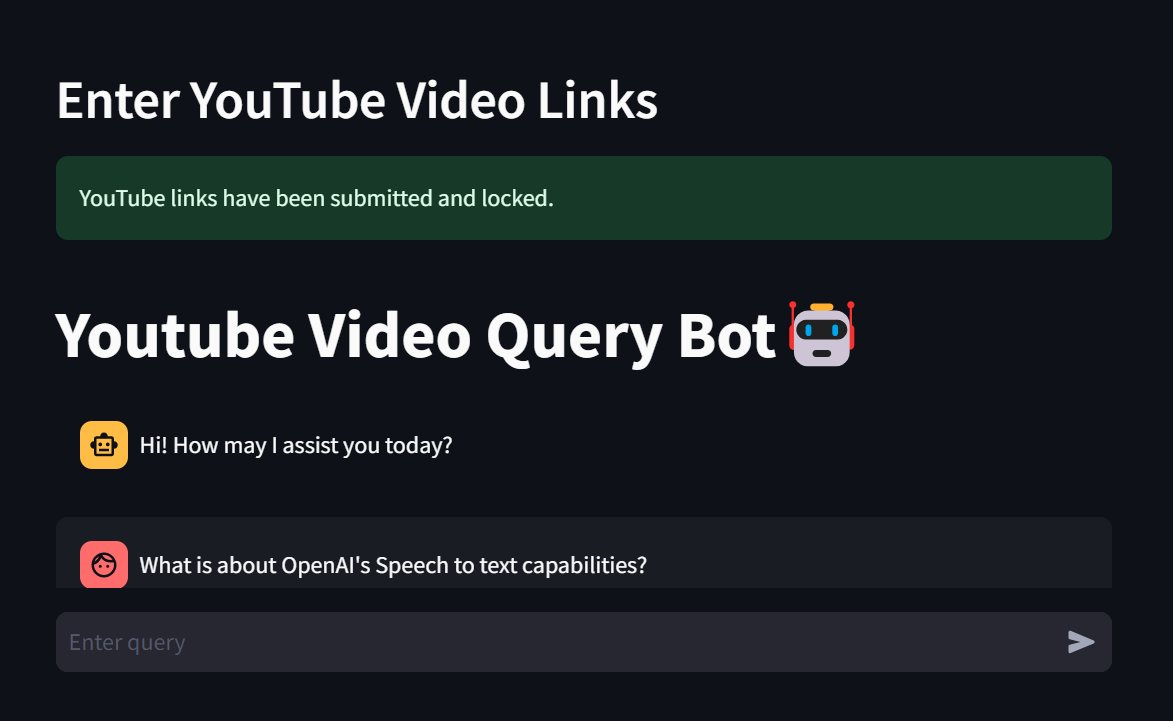
else:
st.success("YouTube links have been submitted and locked.")
Once all the youtube links have been inserted and submitted, upload_videos_to_database function is called, which will process all the videos and index them into database. Usually it takes a minute or 2 to process a single video of length 30 minutes, which may vary for user to user.
Chatbot Response Processing
Once all the videos are processed and indexed, user can proceed to query from the list of videos
st.title("Youtube Video Query Bot🤖")

for message in st.session_state.messages:
    with st.chat_message(message["role"]):
        st.write(message["content"])

if user_query := st.chat_input("Enter query"):
    st.session_state.messages.append({"role": "user", "content": user_query})
    with st.chat_message("user"):
        st.write(user_query)

if st.session_state.messages[-1]["role"] != "assistant":
    with st.chat_message("assistant"):
        with st.spinner("Thinking🤔"):
            res_box = st.empty()
            # Get the GPT generated answer and context from the function
            final_response, matching_videos = getanswer(user_query)

        res_box.write(f"{final_response}")

        st.session_state.messages.append({"role": "assistant", "content": final_response})
    # Printing the context text of the partitioned video
    with st.expander(f"Context Details"):
            st.write(matching_videos)
In this part of the code, getanswer function is used to generate response based on the query, user query is passed to the backend function to iterate over videos to select the correct part of the video and then it is transcribed and parsed via GPT to generate response.
Next, we display the answer along with the most relevant context from the video via expander.
Integrating VideoDB and OpenAI services (db_utils.py)
In db_utils.py we define key functions that integrates VideoDB and OpenAI's GPT model into our project along with the logic for generating chatbot responses.
Let's dive into these functions structure.
import streamlit as st
from videodb import connect
from dotenv import load_dotenv
load_dotenv()
import os
from openai import OpenAI
# Get the environment variables
openai_api_key = os.getenv("openai_api_key")
videodb_api_key = os.getenv("videodb_api_key")

client = OpenAI(api_key = openai_api_key)

conn = connect(api_key=videodb_api_key) #Initializing the connection with Videodb
coll = conn.get_collection() # Getting the collection from Database
We first start by establishing connection for Video database and getting the collection. The openai_api_key and videodb_api_key would be getting its value from .env file that we created initially. coll variable gets the collection from the database.
Uploading Video to Database
Next, we create the function that uploads the videos stored in st.session_state.youtube_links variable to database and index them.
# Function to upload videos
def upload_videos_to_database():
    for link in st.session_state.youtube_links:
        try:
            coll.upload(url=link)
            print(f"Video: {link} uploaded successfully")
            for video in coll.get_videos():
                video.index_spoken_words() #Indexing the texts from each video in database to perform query search
                print(f"Indexed {video.name}")
        except Exception as e:
            print(f"Exception occured for video {link} as {e}")
coll.upload() function uploads the url link to the database where it is accessed and stored, the for loop indexes each video which then creates a transcript of the videos.
Getting the resultant portion of the video for query
Now, what happens in Videodb is, when a query is entered, videodb scans the video to find the most relevant part and returns it, the implementation for the same goes as:
# Function to get the resultant video for the query and calling GPT over context text
def getanswer(query):
    result = coll.search(query = query) # Searching the database for matching part to the query
    print("Type: ")
    #Result returns a list of shots
    first_shot = result.get_shots()[0] # Selecting only the first shot from result
    print("First Shots data: ", first_shot)
    video_title = first_shot.video_title #Title of the resultant cropped video
    text = first_shot.text #Transcript of the resultant cropped video
    print("Video Title: ", video_title)
    print("Text: ", text)
    answer = ""
    # Now we pass the query and context text to GPT to generate more precise answer
    answer = get_openai_ans(query=query, text=text)
    matching_video = {
        "video_title": video_title,
        "text": text
    }
    return answer, matching_video
Here, coll.search function searches for the most relevant part to the query from the video collections, then we take the most relevant video from all the collection from the function result.get_shots()[0]. We then extract the title of the video and transcript of the resultant part from the variable first_shot by first_shot.video_title and first_shot.text respectively. You can view more attributes of the video by printing the variable first_shot. We then pass the transcript along with the query to OpenAI's GPT Model to get the answer in a more concise way.
We return the answer along with the matching_video which contains the title and transcript of the resultant video
Parsing transcript and query via GPT
In this function we take query along with transcript of the resultant video to get the answer in a more concise manner.
# Function to genrate precise answers from the context text
def get_openai_ans(query, text):
    messages = [
        {
            "role": "assistant",
            "content": f"""You are an helpful AI chatbot, who answers questions based on the generated transcript of a video. Remember to be precise and to the point while answering questions.
            You need to output the query only based on the below context provided, if you don't find answer in the context, output 'Information to the query is not in the provided video context'
            The context to answer query is: {text}

            Now answer the queries given by user"""
        },
        {
            "role": "user",
            "content": query
        }
    ]

    response = client.chat.completions.create(
        model="gpt-3.5-turbo",
        messages = messages
    )

    answer = response.choices[0].message.content
    return answer
Initially, we create a prompt for the GPT to understand its role and parse the transcript of the video via {text} variable. Next from the role user we pass the query.
Here we are using gpt-3.5-turbo model to answer our queries and pass the message dictionary to the model, and return the answer to the function which is then passed to get_answer function which will output it on streamlit interface.
Use Case
Let us look at one of the use case of the application that we created. We pass the youtube Video links in the textbox provided and click Add Youtube Link button which will store the link in session state variable.
User can add multiple Youtube videos and once all the videos are added click Submit All Youtube Links button which will send all the videos to Videodb to process it.
This is how the User Interface looks once we submit all the links. Now we are ready to query with our Chatbot. The video that we are using for demo purpose is: Building a Conversational Voice Chatbot: OpenAI Speech-to-Text & Text-to-Speech Integration
Here's the conversation that we had with chatbot:
'Assistant': 'Hi! How may I assist you today?'

'User': 'What is the video talking about?'
'Assistant': 'The video is about converting audio or speech into text and building a chatbot using those capabilities in a streamlit application. It also mentions that the necessary code is explained in the video and suggests watching the video for a detailed understanding.'

'User': 'Is it a strealit based chatbot or an API that is used?'
'Assistant': 'It is a Streamlit-based chatbot.'

'User': 'How do we pass Audio file?'
'Assistant': 'To pass the audio file, we declare a file name variable, open the file, and write the audio bytes obtained from the audio recorder into the file. This file containing the audio data is then sent to the transcription endpoint for processing.'

'User': 'How do we use this Audio file to create transcript?'
'Assistant': 'To use the audio file to create a transcript, we first declare a file name and then write the audio bytes from the audio recorder to that file. Once we have the file containing the audio, we call the speech to text function, which internally calls the transcriptions endpoint of OpenAI for transcription.'

'User': 'What is speech to text function doing?'
'Assistant': 'The speech to text function is taking an audio file, attaching it as a file element, calling the transcriptions endpoint, and generating a transcript of the audio.'

'User': 'Explain about Speech to text part'
'Assistant': 'The speech to text function involves taking an audio file, attaching it as a file element, and then calling the transcriptions endpoint to obtain a transcript. This transcript is the text version of the audio content. The process essentially converts spoken words into written text through automated transcription.'

'User': 'What is passed in message array?'
'Assistant': 'The message array is initialized with a single message when it is not already present in the session variable. The single message is the assistants first message, which is "Hi, how may I assist you today?" and it contains content and role information.'

'User': 'What we will do if Message array is not present?'
'Assistant': 'If the messages array is not present inside the session variable, which is the Streamlit session state, we will initialize it. We will initialize the message array with a single message, which is the assistants first message: "Hi, how may I assist you today?" This helps in setting up the initial state of the messaging array for the application.'
Additionally, here's the 👇 demo link for the same:
Conclusion
As we wrap up our exploration of Video database and building a chatbot over streamlit that interacts with Videos, let's reflect on what we've accomplished and the potential for further development.
Reflecting on the Project
This project demonstrates the power and versatility of integrating advanced AI services and prospects of Video database with OpenAI's GPT Model into a user-friendly application. By combining OpenAI and Videodb with streamlit we have created a chatbot that can iterate videos and respond over the queries based on the videos.
You can deploy the project on AWS instance to make it available for all by following our video tutorial for deployment on AWS.
Deploy GPT-3 Streamlit App on AWS EC2
Additional Resources
You can access the complete code and documentation here: FutureSmart AI Github.
If your company is looking to embark on a similar journey of transformation and you're in need of a tailored NLP solution, we're here to guide you every step of the way. Our team at FutureSmart AI specializes in crafting custom NLP applications, including generative NLP, RAG, and ChatGPT integrations, tailored to your specific needs.
Don't let your customer Engagement lag behind. Embrace the future of automated, intelligent customer interactions. Reach out to us at contact@futuresmart.ai, and let's discuss how we can build a smarter, more responsive customer Engagement system for your business. Join the ranks of forward-thinking companies leveraging the best of AI, and see the difference for yourself!
For further exploration and references, don't forget to check the Videodb API documentation
If you are looking to build a conversational voice assistant with OpenAI's speech to text and text to speech capabilities, you can watch the Video Tutorial here, additionally complete blog is featured at FutureSmart AI Blogs.
Stay Connected with FutureSmart AI for the Latest in AI Insights -FutureSmart AI
Eager to stay informed about the cutting-edge advancements and captivating insights in the field of AI? Explore AI Demos, your ultimate destination for staying abreast of the newest AI tools and applications. AI Demos serves as your premier resource for education and inspiration. Immerse yourself in the future of AI today by visiting aidemos.com.